Friday, September 30, 2016

Traditions

Every home builds food traditions. These traditions might revolve around holidays or the expertise of certain family members or an annual excursion. My family enjoys finger foods, including particular dips and spreads, on Christmas Eve. My younger daughter is the maker of traditional German pancakes. And, we count on strawberry rhubarb sauce in the spring after a morning of picking strawberries at a local farm.


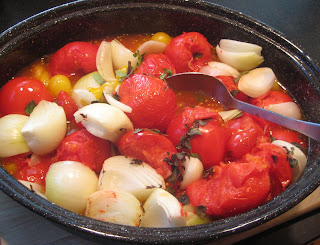
Life can get in the way of food traditions, and we experienced our share of this with the big move this year. No problem. My mantra remains: the most flexible person is the happiest person. This applies to food as much as anything else. Missing a food tradition one year only makes it all the more special the next time around. However, I was bound and determined to make at least one batch of Roasted Tomato Sauce which is a family favorite for pasta, pizza, and bread dip when broiled with a thin layer of Parmigiana Reggiano as my older daughter loves. Delicious!


So, I ordered extra tomatoes from the CSA and went to work on a day that was, quite frankly, far too hot for canning, but I had the time and the tomatoes were ripening too quickly and I remembered how satisfying the sauce would be in the winter when the taste of homegrown tomatoes will only be something in a dream. So, I rolled up my sleeves and got to work. I recommend the same for you before they are all gone. You won't be sorry.


Roasted Tomato Sauce

15 cloves of garlic, peeled and halved
8 to 10 pounds of ripe tomatoes, any variety, washed and cored
4 to 5 large yellow onions, peeled and quartered
1 large handful of fresh herbs, chopped
¼ cup olive oil
½ teaspoon salt
Ground black pepper
1 to 2 tablespoons granulated or raw sugar, optional

  1. In a large roasting pan, gently toss together garlic, tomatoes, onions, herbs, oil, salt, and pepper to taste.
  2. Roast at 450°F for 25 minutes. Gently stir.
  3. Roast for an additional 25 minutes. Stir again.
  4. Roast for 45 minutes more or until tomatoes are softened and broken down into a sauce.
  5. Remove from oven and blend in a blender or with a stick blender until desired texture. Taste for seasoning. If slightly bitter, add sugar and stir.
  6. Eat immediately, refrigerate for up to 5 days, or freeze for up to 10 months.
  7. Or, can in a hot water bath, boiling for 30 minutes.

Yield: 4 to 5 quarts

Saturday, September 24, 2016

Cookie Season

I love the way recipes are handed down like cherished gifts from loved ones, carrying memories and tastes we love to recreate. As soon as the school year starts, the requests for homemade baked goods come rolling in -- a fundraiser here, a meeting there, or a treat to to encourage or thank. I find myself turning time and again to a recipe that I received from an old friend who got it from her sister-in-law I believe.

Kitchen Sink Cookies are flexible and work with whatever delights or tasty remnants you have in the cupboard; hence, you can add in anything to these cookies but the kitchen sink. I used white chocolate and macadamia nut last week to make monster-sized cookies for a fundraiser. Often, I make really small cookies to feed a crowd or give everyone a treat without the consequences of a sugar frenzy afterward. Be creative and you will find Kitchen Sink Cookies to be a staple at your house soon, too.


Kitchen Sink Cookies

Cream together:
3 sticks butter or equivalent of vegetable shortening or coconut oil
2 1/2 cups brown or granulated sugar

Add and blend:
3 eggs
1 ½ teaspoons vanilla extract

Add and blend:
3 cups whole wheat flour
1 ½ teaspoons baking powder
1 teaspoon sea salt

Add and blend:
2 cups whole oats
3 cups chips, nuts, dried fruit, seeds, cereal, pretzels, or any other yummy stuff  you have on hand

Drop by tablespoonfuls onto ungreased baking sheets.

Bake at 350 degrees F for 8 to 10 minutes.

Yield: 8 dozen large cookies

Monday, September 12, 2016

Hail, Caesar!

It should come as no surprise that in the throws of our big move, I hardly cooked the last few months. Moreover, I have to admit that I have been having a hard time getting back to the kitchen. Cooking has had to move to the back burner as other more pressing details in life demanded my attention. To complicate matters, our new hometown has an abundance and variety of good food from restaurants to markets. Exploring has been terribly fun and motivation has been hard for this cook to come by.

Still, my family and I have been missing the old standards that make a regular appearance at our house. Even my older daughter at college has already admitted she misses my cooking. (I was surprised by how quickly her yearnings for a home-cooked meal emerged and secretly did a little dance as I had told her this day would come when she would complain about a particular meal on one of those challenging days of adolescence.) I determined that a CSA share would be a worthy investment, particularly as the heat outside persists.

Nothing motivates this cook more than the arrival of two boxes of seasonal, local produce delivered right to her doorstep. I almost forgot how a CSA share will put your knife skills to the test. Some of the work is simple: cut open a fresh cantaloupe, scoop out the seeds, and slice. Bite after bite of such sweet, flavorful, and juicy melon are the reward and can't be had any other time of the year. Even my husband, who isn't particularly fond of melons, enjoyed a bowl full. On the other hand, some of the work is quite involved as you prep ingredients for a meal, but I may be finding my rhythm again.

So, I began to push myself to return to the cutting board and oven, whisk in hand and mixing bowl at the ready, having determined that some Homemade Staples would be a great place to start. With lettuce in abundance right now and half a loaf of French bread from an amazing local baker getting stale, I had the ingredients to direct my efforts. Never have such words of gratitude emerged from a 14-year-old as when I placed a Caesar salad with homemade croutons on the table for dinner last week.

Simple enough for everyday, Caesar salad never fails to satisfy at our house, and homemade croutons mean you never need to let old bread go to waste. However, you must simply remember one thing: Caesar dressing is hands down the number one reason to always have anchovies in your pantry. Then, you are good to go any time. Here are the beginnings to a simple, sumptuous, September meal for a small gathering from the humble hands of any culpable cook such as I. Hail, Caesar!

Caesar Dressing

2 small garlic cloves, minced
1 teaspoon anchovy paste or 2 olive-oil packed anchovy fillets, drained
2 tablespoons freshly squeezed lemon juice/one lemon
1 tablespoon red wine vinegar
1 teaspoon Dijon mustard
1 teaspoon Worcestershire sauce
½ cup mayonnaise
¼ cup olive oil
⅓ cup Parmesan cheese, finely grated
¼ teaspoon sea salt
¼ teaspoon ground black pepper

Put everything in a bowl or dressing holder. Mix with a whisk or handheld mixer until everything is combined and smooth. Serve immediately or put in fridge. Dressing is good in fridge for 1 week.


Baked Croutons

Dice fresh or dry bread into ½-inch cubes. You may freeze them at this point or use immediately. Toss with enough olive oil to lightly coat (about ¼ cup olive oil for each ½ pound of bread). Season to taste with garlic powder, sea salt, ground black pepper, and/or herbs, to taste. Spread evenly in a single layer on a baking sheet. Bake for 20 minutes at 350°F, stirring halfway through to brown evenly. Use immediately or store in an airtight container for future use.