Friday, October 28, 2016

Pulp-It

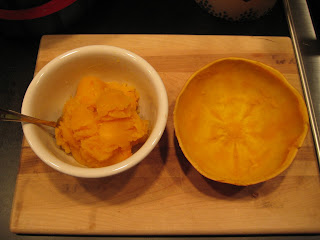
Today, I want to speak from the "pulp-it." I want to encourage you to dig into the flesh of an edible pumpkin and pull out a delicious and versatile homemade staple. You can take a pie pumpkin straight from the field, separate the flesh and seeds from the skin, and walk away with Pumpkin Puree to freeze and Roasted Pumpkin Seeds to snack on and share immediately! The puree will serve you well far beyond a pumpkin pie at Thanksgiving. Use it in baked goods such as quick breads, cakes, and muffins for extra moist results. Toss it in a sauce or stuff it into a pasta. Or, add it to waffle or pancake batter. The results may not lead to a religious experience, but they remind me to be grateful for the harvest and the land that produced it. Not bad for a bit of effort in regards to one small gourd.


Pumpkin Puree and Roasted Pumpkin Seeds

Halve a pie pumpkin. Scoop out seeds and pulp; set aside. Place pumpkin halves (face side down) in a baking pan with half an inch of water. Bake at 375˚F for 1 hour until flesh is softened. Remove from baking pan and place face side up to cool. Remove flesh with a large spoon and cover tightly to store. A 3½ to 4 pound pie pumpkin will give you about 4 cups of pumpkin puree.

While pumpkin bakes, separate pumpkin seeds from the pulp, rinsing thoroughly under running water in a fine mesh sieve to remove as much pulp as possible. Drain well. Place seeds on a rimmed baking sheet. Drizzle lightly with olive oil and sprinkle with sea salt. Combine with your hands and spread out evenly in a single layer. Bake at 350˚F for 10 minutes. Stir with a spatula, spreading out seeds evenly across sheet once again. Bake an additional 10 minutes. Cool prior to eating.


NOTE: You can vary the flavor of the oil and salt to taste. Add soy sauce, Worcestershire sauce, or hot sauce. Or, go for a sweet and salty flavor by adding a bit of brown sugar, honey, cinnamon, nutmeg, and/or ground cloves. Be creative!


Friday, October 21, 2016

Fridays

In my family, Fridays are traditionally pizza nights. After a hectic week, we like nothing better than to chat in the kitchen about the week while the pizza bakes and then fall in front of the television with our slices and desired drink in hand. As the girls have become teenagers, Friday nights such as this don't come around as often as they once had, but we still enjoy them when we can.

More often then not, we pull a frozen pizza -- Tombstone is our favorite -- from the freezer to bake. However, when I get the energy, inspiration, and encouragement, we will make pizza from scratch. This is a family affair. I prepare the dough and share my favorite basic recipe below which anyone can prepare. My husband stretches and places the dough on the pans, sometimes one large pizza, other times smaller personal pizzas. My daughters place the basic ingredients, and my husband adds ingredients to a portion of the pizza just for us.

Slow Roasted Cherry Tomatoes stretch the last of the summer bounty just a bit longer and make a wonderful pizza topping. They can eaten straight up as a snack or be tossed in pasta or top a cracker and cheese for an appetizer. Their large flavor impact belies how simple they are to make. Further, Slow Roasted Cherry Tomatoes make a beautiful, colorful gift in a Mason jar tied with a ribbon for the holidays or to have on hand as a hostess gift anytime. I look for an heirloom variety of cherry tomatoes for a spectrum of color and am always sure to save the olive oil used for storing as it is also flavorful for other dishes.

Slow Roasted Cherry Tomatoes


Halve a pint of cherry tomatoes. Toss with olive oil, garlic, sea salt, and freshly ground pepper to taste until well coated and thoroughly combined. You may also sprinkle them with freshly chopped herbs of choice. Spread onto a baking sheet and bake at 225°F for 2 to 4 hours. Time varies due to size and moisture content of cherry tomatoes. You want them to be shriveled, slightly moist, and lightly browned. Use immediately or cool and store covered in olive oil in the refrigerator.


Pizza Crust

1 tablespoon active dry yeast (one package)
1 teaspoon sugar
1 ⅓ cups warm water (100° to 120°)
3 cups unbleached white bread or pastry flour
½ cup whole wheat flour
1 teaspoon kosher salt
½ teaspoon ground black pepper
3 teaspoons olive oil
1 to 2 cups unbleached white bread or pastry flour for kneading


  1. Stir yeast into sugar and warm water and set aside to proof until it bubbles and foams, usually about 10 to 12 minutes.
  2. Stir in flours, salt, and pepper and 2 teaspoons olive oil. Mix well, adding flour if necessary so that the dough is not sticky, forms a ball, and can be handled. Knead dough by pressing ball flat with the heels of your hands, folding it over and pressing down again until flat, and so on for about 10 minutes. Add flour as needed to prevent sticking.
  3. Place ball of kneaded dough in a large bowl lightly oiled with remaining teaspoon olive oil and cover with a towel. Set aside to rise in a warm, draft-free place until doubled in size, usually 40 to 60 minutes.
  4. While dough is rising, prepare toppings.
  5. Punch down risen dough and knead for a couple of minutes, adding flour to keep dough from sticking to the board or your hands. Cut dough in half to make tow crusts. (Dough may now be frozen. Punch it down and either roll it out or form ball to be re-kneaded and rolled out into the desired shape after thawing. It takes about 2 hours at room temperature for ball of dough to defrost. After re-kneading, adding flour if needed, and rolling out thawed dough, let it rise for about a half hour before baking.)
  6. With your hands or a rolling pin, shape each half of the dough into a 12- to15-inch rectangle or circle. Press down and out from the center of dough until crust has reached the desired thickness. Place dough on a lightly oiled pan and let it rise for about 15 minutes. Add toppings. Bake for 20 to 30 minutes at 425°, until bottom of crust is golden and dough is firm throughout.
Yield: Two 12- to 15-inch pizza crusts

Note: Be creative and substitute in ½ cup of your favorite flour (such as rye flour, cornmeal, or even ground oatmeal, for example) for ½ cup of the white flour.


Moosewood Restaurant New Classics by The Moosewood Collective

Friday, October 14, 2016

Apple a Day


I know you've heard the saying, "An apple a day keeps the doctor away." My dad certainly took this to heart and has eaten an apple nearly every day of his adult life. A child of WWII, he has been known to eat the WHOLE apple except for the stem. My Applesauce recipe embraces this notion: remove the stem and cook the entire apple once quartered. After the cooked apple is run through a food mill, the result is smooth and flavorful with a rosy tint from the skin. If canned, Applesauce stands at the ready throughout the year for a taste of fall's harvest anytime -- try it with a bowl of oatmeal on a chilly morn. Please note that I have never added more than 1/4 cup sugar to a large batch. And, please feel free to spice with cinnamon, nutmeg, cloves, cardamom, or allspice to your heart's desire. I am a purist and keep it simple.


Applesauce
from Ball Blue Book

2 ½ to 3 ½ pounds apples per quart
Water
Sugar (optional)


Wash, stem, and quarter apples; do not core or peel. Cook apples until soft in a large covered saucepot with just enough water to prevent sticking. Press apples and juice through a sieve or food mill to separate seeds and peel from the pulp. Return apple pulp to saucepot. Add ¼ cup sugar per pound of apples or to taste, if desired. Bring applesauce to a boil, stirring to prevent sticking. Reduce heat; simmer 5 minutes, stirring to prevent sticking. Ladle hot sauce into hot jars, leaving ½-inch headspace. Remove air bubbles. Adjust two-piece caps. Process pints and quarts 20 minutes in a boiling-water canner.

Friday, October 7, 2016

Blue

In the last few years, I have taken to blue pottery. With so many patterns made by so many different makers, blue pottery is easily found in vintage stores and easy to mix and match. I also find that blue pottery goes well with basic white and compliments so many other colors of dishware, making it extremely versatile.

I am also extremely fond of blueberries straight up as a snack, on yogurt or cereal, and in smoothies and baked goods. Blueberries like most berries are extremely easy to freeze while in season. Although I didn't have time to pick blueberries this year, I did manage to freeze one batch which I recently pulled out and made into Blueberry Sauce, simple and also very versatile.

In turn, I used my Blueberry Sauce to make my Oatmeal Shortbread Bars, another standard in our family. As you can see below, I have used a variety of fruit for this recipe over the years and am never dissatisfied. My only caution is to make sure your fruit sauce is not too watery. Rather, a thicker sauce will ensure that the crust of your bars remains firm rather than mushy and your remain rosy rather than blue yourself.


Blueberry Sauce
from Whole Grain Mornings by Megan Gordon

1 pound fresh or frozen blueberries
1 tablespoon orange or lemon zest (optional)
1 tablespoon honey
cup natural cane sugar


Combine all of the ingredients in a small saucepan. Cook over medium heat until the mixture begins to slowly bubble and boil. Decrease the heat to low and simmer until the mixture begins to thicken, about 8 minutes. Remove from the heat. Serve warm or at room temperature, or let cool and store in an airtight container in the refrigerator for up to 3 weeks, or in the freezer for up to 6 months.

Yield: 2 cups

Blueberries

Pears

Cherries

Oatmeal Shortbread Bars

Substitute any whole grain or nut flour for those listed in these bars shown here with cherries.

1 cup unbleached all-purpose flour
¾ cup oatmeal
½ cup whole wheat pastry flour
½ cup packed brown sugar
½ teaspoon table salt
¾ cup (12 tablespoons) unsalted butter, softened
2 to 3 cups fruit in thickened syrup

  1. Grease an 8-by-8-inch baking pan.
  2. In a medium bowl, combine flours, oatmeal, brown sugar, and salt. Cut butter into flour         mixture, using a pastry blender, two forks, or your clean hands, until mixture resembles coarse sand.
  3. Press two thirds of mixture into the bottom of the prepared pan, finishing by pressing firmly and evenly with the bottom of a drinking glass.
  4. Bake at 350°F for 10 minutes until lightly browned.
  5. Remove from oven. Top with fruit and spread evenly over the base. Sprinkle remaining one third of flour mixture over fruit layer.
  6. Bake for an additional 25 to 30 minutes until bubbly and golden brown.
  7. Remove from oven and cool completely prior to cutting into squares.

Yield: 16 two-inch square bars