Friday, December 2, 2016

Versatile

During the holidays, I am always looking for ways to save time and knock off two birds with one stone. I simply don't have enough time in the day to do everything I want to do and already battle fatigue in the process. In the midst of the frenzy, eating well goes a long way to helping me feel better both physically and mentally.

As a result, even though basil is not in season, if you can snag a fresh bunch at the market, I suggest making a large batch of pesto. Pesto is incredibly versatile. It can be used to add some zip to an otherwise bland sandwich, particularly if you are still eating turkey left over from Thanksgiving like I am. It can be tossed with pasta or salad along with any other favorite additions for a quick dinner. And, it can be used in endless ways in appetizers. You can be creative, but in a bind all you need is a cracker, a favorite cheese, and a dab of pesto. Done.

I use pesto to flavor soups and try to make a pot of soup nearly every week this time of year. Then, I know I have a healthy and satisfying lunch at the ready. When I really feel decadent, I will buy a baguette, break off a chunk, and dip it right into the pesto for a special side to accompany my bowl of soup. In any event, having a container of pesto on hand simply makes the holidays easier, tastier, and greener. So seasonal, after all.


Classic Pesto

3 cloves garlic, raw or toasted
¼ cup pine nuts, raw or toasted
½ teaspoon salt
2 cups packed basil leaves
½ cup olive oil
½ cup Parmigiano-Reggiano, grated
Ground black pepper


  1. Process garlic, pine nuts, and salt in a food processor until smooth. Scrape down sides.
  2. Add basil and pulse until no whole leaves remain. Scrape down sides.
  3. With the machine running, add olive oil, pouring in a slow and steady stream. Scrape down sides.
  4. Add cheese and pulse for a few seconds until well blended. Season with additional salt and ground black pepper to taste.
Note: Toasting will deepen the flavor of the pine nuts and take the edge off of the garlic. If you are freezing your pesto, you can blanch your basil for 30 seconds prior to processing the pesto. This will maintain the bright green color of pesto, which will otherwise darken as it freezes.

Friday, November 18, 2016

Legacy


After the political turmoil of the last week, I have been turning to activities that require my full attention. I have been tuning out from all media, even my beloved NPR, and focusing to clear my head and calm my heart. To be honest, my admissions work is in high gear as well so I actually do need to get things accomplished as well as deadlines loom, but the work has been a welcome respite.

With Thanksgiving almost upon us, I have turned to planning a menu, trying to keep it simple yet full of family favorites. I will also try to use as much of the produce that arrives in our CSA share at the end of the week. I find such a focus on the harvest is true to the intent of the holiday. Thoughts of gratitude this time of year, always bring me back to Grandma's Pie Crust Mix and the baking of pies. 

Pies are certainly a part of our nation's culinary heritage and none more so than pumpkin pie. I will bake one next week to be eaten with real whipped cream and think of all the pie bakers that have come ahead of me, my daughters' long-term legacy: those who came as immigrants, who scraped up from poverty and hunger, who knew war had no victors, who experience the Great Depression as well as World War, who worked when work was not only physically hard but dangerous, who broke barriers and endured, who only looked beyond self to community and understood our social contract to one another began with selflessness, humility, and respect, 

I will set my moral compass to this legacy and feel deep gratitude for my innumerable blessings. And, I will contemplate these questions over pie and a large cup of strong coffee with hot milk and a bit of sugar: Do you see your success as, at least in part, a community endeavor? And, in some small way, the failings of your community as also your own?

Happy Thanksgiving, friends. Build legacy that will make generations proud. Thanks, Grandma!


Friday, November 11, 2016

Sweet Corn

Even though the days of buying sweet corn at the farmer stand are long gone, autumn and its accompanying holidays seem the perfect time to make "Sweet Corn" Bread. Corn bread is the perfect pairing for a pot of stew or chili or vegetable soup. It also completes a breakfast of eggs and sausage. As for Thanksgiving? You won't regret adding this recipe to your menu of sides. 

"Sweet Corn" Bread began as another recipe passed down from a friend, who got it from another friend years ago. The best recipes withstand the test of time as well as a bit of tweaking and please the palate again and again in my book. As the title states, this corn bread is sweet and rests on raw corn kernels along with the prerequisite corn meal -- use frozen corn, if fresh corn cobs are out of season.


"SWEET CORN" BREAD

2 cups unbleached all-purpose flour
2 cups cornmeal
2 tablespoons baking powder
1 teaspoon sea salt
1 cup (2 sticks) unsalted butter, at room temperature
1 cup granulated sugar
¼ cup honey
4 eggs
2 cups buttermilk
1 cup fresh raw corn kernels sliced off the cob (about 2 ears of corn)

1.      In a medium bowl, combine flour, cornmeal, baking powder, and salt. Set dry ingredients aside.
2.      In a large mixing bowl, beat butter and sugar until light and creamy. Add honey. Add eggs, one at a time, and buttermilk. Combine thoroughly.
3.   Fold dry ingredients into batter; mix in corn kernels until fully combined.
4.   Butter one 9-inch-by-13-inch baking pans. Spread batter evenly in pan, smoothing the top.
5.   Bake in a 350ºF oven for 30 to 35 minutes, until light brown and springs back in center.
6.   Let cool slightly in pan before cutting. Eat immediately or store tightly sealed to retain moistness.

Yield: 16 large pieces

Friday, November 4, 2016

Quick Breads

Quick breads remain a staple comfort food in our house. They offer ease and contentment in a loaf. My recipe for Whole Wheat Olive Oil Produce Quick Breads tends towards health and flexibility. Use this recipe, if you have some overripe bananas on the counter, a bumper crop of zucchini, or an extra bag of cranberries at Christmas. Soon, I will be cooking up plenty of Pumpkin Puree at my house after all the pumpkins I bought for decoration this fall have served their purpose -- I specifically buy only a few pumpkins for carving and try to fill out the rest of my needs with edible pumpkins for this very reason. If a rainy day or sore throat or busy week are leaving you dragging, prepare a loaf of quick bread to your liking and feel the comfort in both body and soul. Note: You can also use this dough to make regular or mini muffins as directed below. See? Flexible!


Whole Wheat Olive Oil Produce Quick Breads

4 eggs
3/4 cup olive oil
3/4 cup low-fat buttermilk or plain yogurt
1 cup granulated sugar
1/4 cup brown sugar
2 teaspoons vanilla extract

2 cups grated zucchini or
2 cups grated carrot or
2 cups coarsely chopped cranberries or
1 1/2 cups pumpkin puree or mashed ripe bananas

2 cups unbleached all- purpose flour
1 cup whole wheat pastry flour
1/2 cup flax seed meal or oat bran or wheat bran
2 teaspoons ground cinnamon or combination of spices to taste (see below)
2 teaspoons baking powder
2 teaspoons baking soda
1 teaspoon salt

Optional: add spices to taste. I suggest --
1 teaspoon ground cinnamon
1/2 teaspoon ground allspice
1/2 teaspoon ground cardamom
1/2 teaspoon ground cloves
1/2 teaspoon ground ginger
1/2 teaspoon ground nutmeg

1 cup chocolate chips or coarsely chopped pecan or walnuts or unsweetened coconut, optional

  1. Grease and flour two 8-by-4 inch loaf pans or line muffin pans with baking cups for 24 regular size muffins or 48 mini muffins.
  2. In a large bowl, beat eggs. Beat in oil, buttermilk or yogurt, sugars, and vanilla until light and fluffy. Mix in produce or choice. Set aside
  3. In a separate bowl, combine flours, flax seed meal or bran, cinnamon or spice mix of choice, baking powder, baking soda, and salt. Stir flour mixture into egg mixture until just combined.
  4. Fold in chocolate chips or nuts, if desired.
  5. Divide batter into prepared pans.
  6. For bread: bake at 350°F for 60 minutes or until a tester inserted into the center comes out clean. For regular muffins: bake at 350°F for 30 minutes or until a tester inserted into the center comes out clean. For mini muffins: bake at 350°F for 20 minutes or until a tester inserted into the center comes out clean.
  7. Cool completely. Store in an airtight container.

Yield: 2 loaves or 24 regular-size muffins or 48 mini muffins

Friday, October 28, 2016

Pulp-It

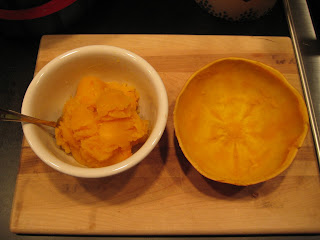
Today, I want to speak from the "pulp-it." I want to encourage you to dig into the flesh of an edible pumpkin and pull out a delicious and versatile homemade staple. You can take a pie pumpkin straight from the field, separate the flesh and seeds from the skin, and walk away with Pumpkin Puree to freeze and Roasted Pumpkin Seeds to snack on and share immediately! The puree will serve you well far beyond a pumpkin pie at Thanksgiving. Use it in baked goods such as quick breads, cakes, and muffins for extra moist results. Toss it in a sauce or stuff it into a pasta. Or, add it to waffle or pancake batter. The results may not lead to a religious experience, but they remind me to be grateful for the harvest and the land that produced it. Not bad for a bit of effort in regards to one small gourd.


Pumpkin Puree and Roasted Pumpkin Seeds

Halve a pie pumpkin. Scoop out seeds and pulp; set aside. Place pumpkin halves (face side down) in a baking pan with half an inch of water. Bake at 375˚F for 1 hour until flesh is softened. Remove from baking pan and place face side up to cool. Remove flesh with a large spoon and cover tightly to store. A 3½ to 4 pound pie pumpkin will give you about 4 cups of pumpkin puree.

While pumpkin bakes, separate pumpkin seeds from the pulp, rinsing thoroughly under running water in a fine mesh sieve to remove as much pulp as possible. Drain well. Place seeds on a rimmed baking sheet. Drizzle lightly with olive oil and sprinkle with sea salt. Combine with your hands and spread out evenly in a single layer. Bake at 350˚F for 10 minutes. Stir with a spatula, spreading out seeds evenly across sheet once again. Bake an additional 10 minutes. Cool prior to eating.


NOTE: You can vary the flavor of the oil and salt to taste. Add soy sauce, Worcestershire sauce, or hot sauce. Or, go for a sweet and salty flavor by adding a bit of brown sugar, honey, cinnamon, nutmeg, and/or ground cloves. Be creative!


Friday, October 21, 2016

Fridays

In my family, Fridays are traditionally pizza nights. After a hectic week, we like nothing better than to chat in the kitchen about the week while the pizza bakes and then fall in front of the television with our slices and desired drink in hand. As the girls have become teenagers, Friday nights such as this don't come around as often as they once had, but we still enjoy them when we can.

More often then not, we pull a frozen pizza -- Tombstone is our favorite -- from the freezer to bake. However, when I get the energy, inspiration, and encouragement, we will make pizza from scratch. This is a family affair. I prepare the dough and share my favorite basic recipe below which anyone can prepare. My husband stretches and places the dough on the pans, sometimes one large pizza, other times smaller personal pizzas. My daughters place the basic ingredients, and my husband adds ingredients to a portion of the pizza just for us.

Slow Roasted Cherry Tomatoes stretch the last of the summer bounty just a bit longer and make a wonderful pizza topping. They can eaten straight up as a snack or be tossed in pasta or top a cracker and cheese for an appetizer. Their large flavor impact belies how simple they are to make. Further, Slow Roasted Cherry Tomatoes make a beautiful, colorful gift in a Mason jar tied with a ribbon for the holidays or to have on hand as a hostess gift anytime. I look for an heirloom variety of cherry tomatoes for a spectrum of color and am always sure to save the olive oil used for storing as it is also flavorful for other dishes.

Slow Roasted Cherry Tomatoes


Halve a pint of cherry tomatoes. Toss with olive oil, garlic, sea salt, and freshly ground pepper to taste until well coated and thoroughly combined. You may also sprinkle them with freshly chopped herbs of choice. Spread onto a baking sheet and bake at 225°F for 2 to 4 hours. Time varies due to size and moisture content of cherry tomatoes. You want them to be shriveled, slightly moist, and lightly browned. Use immediately or cool and store covered in olive oil in the refrigerator.


Pizza Crust

1 tablespoon active dry yeast (one package)
1 teaspoon sugar
1 ⅓ cups warm water (100° to 120°)
3 cups unbleached white bread or pastry flour
½ cup whole wheat flour
1 teaspoon kosher salt
½ teaspoon ground black pepper
3 teaspoons olive oil
1 to 2 cups unbleached white bread or pastry flour for kneading


  1. Stir yeast into sugar and warm water and set aside to proof until it bubbles and foams, usually about 10 to 12 minutes.
  2. Stir in flours, salt, and pepper and 2 teaspoons olive oil. Mix well, adding flour if necessary so that the dough is not sticky, forms a ball, and can be handled. Knead dough by pressing ball flat with the heels of your hands, folding it over and pressing down again until flat, and so on for about 10 minutes. Add flour as needed to prevent sticking.
  3. Place ball of kneaded dough in a large bowl lightly oiled with remaining teaspoon olive oil and cover with a towel. Set aside to rise in a warm, draft-free place until doubled in size, usually 40 to 60 minutes.
  4. While dough is rising, prepare toppings.
  5. Punch down risen dough and knead for a couple of minutes, adding flour to keep dough from sticking to the board or your hands. Cut dough in half to make tow crusts. (Dough may now be frozen. Punch it down and either roll it out or form ball to be re-kneaded and rolled out into the desired shape after thawing. It takes about 2 hours at room temperature for ball of dough to defrost. After re-kneading, adding flour if needed, and rolling out thawed dough, let it rise for about a half hour before baking.)
  6. With your hands or a rolling pin, shape each half of the dough into a 12- to15-inch rectangle or circle. Press down and out from the center of dough until crust has reached the desired thickness. Place dough on a lightly oiled pan and let it rise for about 15 minutes. Add toppings. Bake for 20 to 30 minutes at 425°, until bottom of crust is golden and dough is firm throughout.
Yield: Two 12- to 15-inch pizza crusts

Note: Be creative and substitute in ½ cup of your favorite flour (such as rye flour, cornmeal, or even ground oatmeal, for example) for ½ cup of the white flour.


Moosewood Restaurant New Classics by The Moosewood Collective

Friday, October 14, 2016

Apple a Day


I know you've heard the saying, "An apple a day keeps the doctor away." My dad certainly took this to heart and has eaten an apple nearly every day of his adult life. A child of WWII, he has been known to eat the WHOLE apple except for the stem. My Applesauce recipe embraces this notion: remove the stem and cook the entire apple once quartered. After the cooked apple is run through a food mill, the result is smooth and flavorful with a rosy tint from the skin. If canned, Applesauce stands at the ready throughout the year for a taste of fall's harvest anytime -- try it with a bowl of oatmeal on a chilly morn. Please note that I have never added more than 1/4 cup sugar to a large batch. And, please feel free to spice with cinnamon, nutmeg, cloves, cardamom, or allspice to your heart's desire. I am a purist and keep it simple.


Applesauce
from Ball Blue Book

2 ½ to 3 ½ pounds apples per quart
Water
Sugar (optional)


Wash, stem, and quarter apples; do not core or peel. Cook apples until soft in a large covered saucepot with just enough water to prevent sticking. Press apples and juice through a sieve or food mill to separate seeds and peel from the pulp. Return apple pulp to saucepot. Add ¼ cup sugar per pound of apples or to taste, if desired. Bring applesauce to a boil, stirring to prevent sticking. Reduce heat; simmer 5 minutes, stirring to prevent sticking. Ladle hot sauce into hot jars, leaving ½-inch headspace. Remove air bubbles. Adjust two-piece caps. Process pints and quarts 20 minutes in a boiling-water canner.

Friday, October 7, 2016

Blue

In the last few years, I have taken to blue pottery. With so many patterns made by so many different makers, blue pottery is easily found in vintage stores and easy to mix and match. I also find that blue pottery goes well with basic white and compliments so many other colors of dishware, making it extremely versatile.

I am also extremely fond of blueberries straight up as a snack, on yogurt or cereal, and in smoothies and baked goods. Blueberries like most berries are extremely easy to freeze while in season. Although I didn't have time to pick blueberries this year, I did manage to freeze one batch which I recently pulled out and made into Blueberry Sauce, simple and also very versatile.

In turn, I used my Blueberry Sauce to make my Oatmeal Shortbread Bars, another standard in our family. As you can see below, I have used a variety of fruit for this recipe over the years and am never dissatisfied. My only caution is to make sure your fruit sauce is not too watery. Rather, a thicker sauce will ensure that the crust of your bars remains firm rather than mushy and your remain rosy rather than blue yourself.


Blueberry Sauce
from Whole Grain Mornings by Megan Gordon

1 pound fresh or frozen blueberries
1 tablespoon orange or lemon zest (optional)
1 tablespoon honey
cup natural cane sugar


Combine all of the ingredients in a small saucepan. Cook over medium heat until the mixture begins to slowly bubble and boil. Decrease the heat to low and simmer until the mixture begins to thicken, about 8 minutes. Remove from the heat. Serve warm or at room temperature, or let cool and store in an airtight container in the refrigerator for up to 3 weeks, or in the freezer for up to 6 months.

Yield: 2 cups

Blueberries

Pears

Cherries

Oatmeal Shortbread Bars

Substitute any whole grain or nut flour for those listed in these bars shown here with cherries.

1 cup unbleached all-purpose flour
¾ cup oatmeal
½ cup whole wheat pastry flour
½ cup packed brown sugar
½ teaspoon table salt
¾ cup (12 tablespoons) unsalted butter, softened
2 to 3 cups fruit in thickened syrup

  1. Grease an 8-by-8-inch baking pan.
  2. In a medium bowl, combine flours, oatmeal, brown sugar, and salt. Cut butter into flour         mixture, using a pastry blender, two forks, or your clean hands, until mixture resembles coarse sand.
  3. Press two thirds of mixture into the bottom of the prepared pan, finishing by pressing firmly and evenly with the bottom of a drinking glass.
  4. Bake at 350°F for 10 minutes until lightly browned.
  5. Remove from oven. Top with fruit and spread evenly over the base. Sprinkle remaining one third of flour mixture over fruit layer.
  6. Bake for an additional 25 to 30 minutes until bubbly and golden brown.
  7. Remove from oven and cool completely prior to cutting into squares.

Yield: 16 two-inch square bars

Friday, September 30, 2016

Traditions

Every home builds food traditions. These traditions might revolve around holidays or the expertise of certain family members or an annual excursion. My family enjoys finger foods, including particular dips and spreads, on Christmas Eve. My younger daughter is the maker of traditional German pancakes. And, we count on strawberry rhubarb sauce in the spring after a morning of picking strawberries at a local farm.


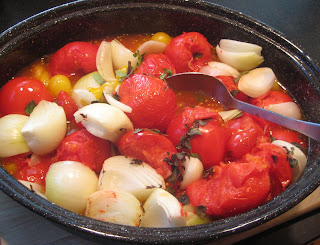
Life can get in the way of food traditions, and we experienced our share of this with the big move this year. No problem. My mantra remains: the most flexible person is the happiest person. This applies to food as much as anything else. Missing a food tradition one year only makes it all the more special the next time around. However, I was bound and determined to make at least one batch of Roasted Tomato Sauce which is a family favorite for pasta, pizza, and bread dip when broiled with a thin layer of Parmigiana Reggiano as my older daughter loves. Delicious!


So, I ordered extra tomatoes from the CSA and went to work on a day that was, quite frankly, far too hot for canning, but I had the time and the tomatoes were ripening too quickly and I remembered how satisfying the sauce would be in the winter when the taste of homegrown tomatoes will only be something in a dream. So, I rolled up my sleeves and got to work. I recommend the same for you before they are all gone. You won't be sorry.


Roasted Tomato Sauce

15 cloves of garlic, peeled and halved
8 to 10 pounds of ripe tomatoes, any variety, washed and cored
4 to 5 large yellow onions, peeled and quartered
1 large handful of fresh herbs, chopped
¼ cup olive oil
½ teaspoon salt
Ground black pepper
1 to 2 tablespoons granulated or raw sugar, optional

  1. In a large roasting pan, gently toss together garlic, tomatoes, onions, herbs, oil, salt, and pepper to taste.
  2. Roast at 450°F for 25 minutes. Gently stir.
  3. Roast for an additional 25 minutes. Stir again.
  4. Roast for 45 minutes more or until tomatoes are softened and broken down into a sauce.
  5. Remove from oven and blend in a blender or with a stick blender until desired texture. Taste for seasoning. If slightly bitter, add sugar and stir.
  6. Eat immediately, refrigerate for up to 5 days, or freeze for up to 10 months.
  7. Or, can in a hot water bath, boiling for 30 minutes.

Yield: 4 to 5 quarts

Saturday, September 24, 2016

Cookie Season

I love the way recipes are handed down like cherished gifts from loved ones, carrying memories and tastes we love to recreate. As soon as the school year starts, the requests for homemade baked goods come rolling in -- a fundraiser here, a meeting there, or a treat to to encourage or thank. I find myself turning time and again to a recipe that I received from an old friend who got it from her sister-in-law I believe.

Kitchen Sink Cookies are flexible and work with whatever delights or tasty remnants you have in the cupboard; hence, you can add in anything to these cookies but the kitchen sink. I used white chocolate and macadamia nut last week to make monster-sized cookies for a fundraiser. Often, I make really small cookies to feed a crowd or give everyone a treat without the consequences of a sugar frenzy afterward. Be creative and you will find Kitchen Sink Cookies to be a staple at your house soon, too.


Kitchen Sink Cookies

Cream together:
3 sticks butter or equivalent of vegetable shortening or coconut oil
2 1/2 cups brown or granulated sugar

Add and blend:
3 eggs
1 ½ teaspoons vanilla extract

Add and blend:
3 cups whole wheat flour
1 ½ teaspoons baking powder
1 teaspoon sea salt

Add and blend:
2 cups whole oats
3 cups chips, nuts, dried fruit, seeds, cereal, pretzels, or any other yummy stuff  you have on hand

Drop by tablespoonfuls onto ungreased baking sheets.

Bake at 350 degrees F for 8 to 10 minutes.

Yield: 8 dozen large cookies

Monday, September 12, 2016

Hail, Caesar!

It should come as no surprise that in the throws of our big move, I hardly cooked the last few months. Moreover, I have to admit that I have been having a hard time getting back to the kitchen. Cooking has had to move to the back burner as other more pressing details in life demanded my attention. To complicate matters, our new hometown has an abundance and variety of good food from restaurants to markets. Exploring has been terribly fun and motivation has been hard for this cook to come by.

Still, my family and I have been missing the old standards that make a regular appearance at our house. Even my older daughter at college has already admitted she misses my cooking. (I was surprised by how quickly her yearnings for a home-cooked meal emerged and secretly did a little dance as I had told her this day would come when she would complain about a particular meal on one of those challenging days of adolescence.) I determined that a CSA share would be a worthy investment, particularly as the heat outside persists.

Nothing motivates this cook more than the arrival of two boxes of seasonal, local produce delivered right to her doorstep. I almost forgot how a CSA share will put your knife skills to the test. Some of the work is simple: cut open a fresh cantaloupe, scoop out the seeds, and slice. Bite after bite of such sweet, flavorful, and juicy melon are the reward and can't be had any other time of the year. Even my husband, who isn't particularly fond of melons, enjoyed a bowl full. On the other hand, some of the work is quite involved as you prep ingredients for a meal, but I may be finding my rhythm again.

So, I began to push myself to return to the cutting board and oven, whisk in hand and mixing bowl at the ready, having determined that some Homemade Staples would be a great place to start. With lettuce in abundance right now and half a loaf of French bread from an amazing local baker getting stale, I had the ingredients to direct my efforts. Never have such words of gratitude emerged from a 14-year-old as when I placed a Caesar salad with homemade croutons on the table for dinner last week.

Simple enough for everyday, Caesar salad never fails to satisfy at our house, and homemade croutons mean you never need to let old bread go to waste. However, you must simply remember one thing: Caesar dressing is hands down the number one reason to always have anchovies in your pantry. Then, you are good to go any time. Here are the beginnings to a simple, sumptuous, September meal for a small gathering from the humble hands of any culpable cook such as I. Hail, Caesar!

Caesar Dressing

2 small garlic cloves, minced
1 teaspoon anchovy paste or 2 olive-oil packed anchovy fillets, drained
2 tablespoons freshly squeezed lemon juice/one lemon
1 tablespoon red wine vinegar
1 teaspoon Dijon mustard
1 teaspoon Worcestershire sauce
½ cup mayonnaise
¼ cup olive oil
⅓ cup Parmesan cheese, finely grated
¼ teaspoon sea salt
¼ teaspoon ground black pepper

Put everything in a bowl or dressing holder. Mix with a whisk or handheld mixer until everything is combined and smooth. Serve immediately or put in fridge. Dressing is good in fridge for 1 week.


Baked Croutons

Dice fresh or dry bread into ½-inch cubes. You may freeze them at this point or use immediately. Toss with enough olive oil to lightly coat (about ¼ cup olive oil for each ½ pound of bread). Season to taste with garlic powder, sea salt, ground black pepper, and/or herbs, to taste. Spread evenly in a single layer on a baking sheet. Bake for 20 minutes at 350°F, stirring halfway through to brown evenly. Use immediately or store in an airtight container for future use.

Thursday, February 4, 2016

Frosting

I am a strong believer that it is more important for frosting to taste good than look good, although both can ought to be true at the same time. No fondant for me. And, I am not a fan of of Royal Icing that dries candy hard. Both look great and hold up extremely well but don't please the palate. I will take a frosting that sticks to your fingers and melts in your mouth, hands down.

I also think that having some frosting at the ready in the freezer should be a Homemade Staple. Frosting makes every homemade baked good extra special -- cakes and cookies, muffins and quick breads, May I suggest you keep a package of graham crackers on hand to frost on those days when an unexpected treat might simply serve a guest or ailing family member exceptionally well.

Cream Cheese Frosting tops my family's list of favorites with a touch of tang to complement its sweet creaminess. This frosting is simple enough for every day and delicious enough to top a celebratory cake, too. It is also versatile as you can easily alter the flavor with a simple addition. Play with the recipe. Add a few tablespoons pure maple syrup. Or the rind of a lemon or orange along with a tablespoon of its juice. Or a teaspoon of ground cinnamon or ginger.
I usually double this recipe so that I can freeze half as I did last week, when I made Pumpkin Spice Cake. After freezing two cup portions of pumpkin puree each autumn from my remaining pie pumpkins, I am always ready to bake pumpkin based baked goods such as this to delight and warm loved ones before spring thaws. Both recipes follow and may become regulars in your home as well.

Cream Cheese Frosting

1 4-ounce package cream cheese, at room temperature
¼ cup unsalted butter, at room temperature
1 teaspoon pure vanilla extract
2 cups sifted confectioners’ sugar


In a medium mixer bowl, beat together cream cheese, butter, and vanilla, 3 to 5 minutes or until light and fluffy. Gradually add powdered sugar, beating till smooth.

Pumpkin Spice Cake

4 large eggs
1 ½ cups granulated sugar
¾ cup vegetable oil
2 cups pumpkin purée (homemade or canned)
1 cup unbleached all-purpose flour
1 cup whole wheat pastry flour
2 teaspoons baking powder
2 teaspoons ground cinnamon
1 teaspoon baking soda
¾ teaspoon table salt
½ teaspoon ground cloves
½ teaspoon ground ginger

  1. Butter a 9-by-13-inch baking pan or line 2 pans of 24 cupcake cups.
  2. In a large mixing bowl, beat eggs until light and lemon-colored. Gradually beat in sugar until light and fluffy. Add vegetable oil in a thin stream, beating constantly. Mix in pumpkin purée.
  3. Sift together flours, baking powder, cinnamon, baking soda, salt, ginger, and cloves. Blend into pumpkin mixture, half at a time.
  4. Pour mixture into prepared baking pan. Bake at 350º for 45 to 50 minutes for cake or 20 to 25 minutes for cupcakes, or until cake(s) spring(s) back when lightly touched in the center. Cool pan on a wired rack.
Yield: 16 to 24 servings

Friday, January 29, 2016

Staples

Every pantry includes the basic and necessary food items for a particular cook's kitchen. Launching Gatherings and the Culpable Cook in 2016, I thought I might focus on the Homemade Staples I rely on in my cooking. As I transition from one college town to the next, one home to the next, one kitchen to the next, I want to remind myself that my family's defining foods will remain to comfort us through the changes ahead. Just as our personal props, our core belongings that define us no matter the context, will accompany us to a new stage, so will our favorite foods and dishes accompany us for new gatherings on location in a new setting.
The week after my last post, Launch, about digging into bread pudding, I made an old family favorite of German origins for Julia, Jenny and David's daughter, who is a good friend of my older daughter. Spätzle, a soft egg noodle of southern Germany, are often eaten at our house as dumplings in chicken noodle soup or along with Schnitzel.
These delicate noodles were a regular part of my diet during my junior year abroad, studying in Freiburg, Germany. You can use a slotted spoon to make them, but I received a Spätzle maker from my sister many years ago, and it has gotten plenty of use. If you make Spätzle and enjoy them, this utensil is quite affordable and readily available now on the web.
If you are pressed for time, you can skip the garlic entirely and make a simpler egg noodle without it, although the garlic does lend an incredible amount of flavor. For Julia, I made a traditional dish of Spätzle with cheese and ham called Käsespätzle und Schinken which also follows. Traditionally, I like to add a side of something sweet like apple slices or applesauce and tart like pickled red cabbage to complement the Emmentaler and ham and complete the meal.

Spätzle

1 head garlic
Olive oil
½ cup milk
¼ cup finely chopped Italian flat-leaf parsley leaves or basil leaves
2 tablespoons unsalted butter, melted
¼ teaspoon sea salt
3 eggs, beaten
2 cups unbleached, all-purpose flour


  1. Brush garlic with olive oil, wrap in aluminum foil, and roast at 450˚F for 1 hour until soft. Cool.
  2. Squeeze roasted garlic cloves from their skins into a bowl and mash with a fork to a paste. Add milk, parsley or basil, butter, salt, and eggs, stirring until smooth.
  3. Put flour into a large mixing bowl; form a well in center. Slowly pour in garlic-milk mixture, stirring with a fork to form a smooth batter.
  4. Bring a 5 quart pot of salted water to a boil over high heat. Set Spätzle maker over the pot. Work in batches, scraping batter through holes into water and cooking until dumplings rise to the surface, about 1 minute. Use a slotted spoon to transfer dumpling to a baking sheet.
Käsespätzle und Schinken

3 tablespoons butter
1 medium yellow onion, chopped
2 cups diced ham
1 cup grated Emmentaler cheese

  1. Heat butter in a large ovenproof skillet over medium-high heat. Saute onion until translucent, about 5 minutes. Add dumplings, stirring constantly, cook until lightly browned, 6 to 8 minutes.
  2. Stir ham into dumplings and continue cooking until warmed through; sprinkle with cheese.
  3. Broil with rack 5 inches from heating element until cheese melts, about 2 minutes.

Yield: 4 to 6 servings

Friday, January 22, 2016

Launch

"Do you think any generation before has ever been this obsessed about food?" Jenny asked as four of us sat around her small, round kitchen table.

It was early January, and I had just walked across the street and through the neighbor's yard to her house just cater corner from my own for an impromptu gathering in the early afternoon. I joined another friend, Melissa, Jenny, and her husband, David, for a cup of tea and the fleeting opportunity to try English Christmas pudding, David's masterpiece and a family tradition.

As I thought about it, I came to the conclusion that food has always been an obsession for our species, primarily for survival. Now, some of us on this planet are privileged enough to obsess about food in search of the freshest ingredients to make the most tantalizing recipes, using the finest techniques. Somehow, the juxtaposition of our plenty with the food desert so much of the world's population still experiences puts me to shame.

Yet, sitting with my friends, I was reminded that in our modern, technological era, food serves a most primitive purpose. It connects us to cultural histories, familial traditions, and some of our fondest memories. As David sliced his Christmas pudding, moist and dark with dried fruit soaked in port and served with custard, he shared a piece of his English heritage.

The original family recipe hung on the wall above us, typed, matted, and framed, a family heirloom proudly displayed. David showed us the pudding molds with lids, large for gatherings and small to gift at the holidays, and added that coffee tins make excellent substitutes. Of course, the shared experience led to discussion about our parents and childhoods and holiday traditions.

I absolutely loved the pudding, and hope to try my hand at it, too, next December. More importantly, I will remember the gathering, the friends who extended the offer and shared so openly, and the reason food is one of my obsessions: the gatherings. The conversations and connections at the table with food in hand nurture relationships and cultivate learning in exceptional ways.

So, I hope you will join me as I divide my efforts in the blogosphere between two blogs. First, I will continue A Measured Word as a vehicle for me to write reflective pieces about my life and life in general on the better side of 40. Second, I am launching Gatherings and the Culpable Cook to focus on recipes, all things culinary, and the art of hosting the simplest gatherings at home with friends, old and new. As I contemplate my hand at beginning my own business in our new hometown next year, I hope to use these blogs as a springboard for things deeply personal, my internal, and daringly public, my external persona. If you like what you read and see, subscribe and join me on the journey.